Using Folders
Folders allow you to organize your test cases, and associated test runs in a logical way. Folders consist of one required field (Name) and one optional field (Description). The folder functionality can be found on the Test Cases screen in axe Auditor along the left sidebar area. It includes tools that allow you to create, edit, and/or delete folders.
You can perform the following tasks related to folders in axe Auditor:
Creating a Folder
Folders are simply a way to organize your test cases. By default, Test Cases are included in the 'All' and 'My Test Cases' filters which appear at the top of the left sidebar folders menu on the Test Cases screen when you do not specify a folder when creating a new test case. Likely your project leaders will establish a folder naming convention with categories that make sense for your needs. Folders can be renamed at any time.
In this topic:
- Using the button on the Test Cases screen
- Using the link on the Details panel of the New Test Case screen
Using the button on the Test Cases screen
Follow this procedure any time you want to create a new folder, for the purpose of placing either a future or existing test case in it.
To create a new folder:
-
From the bottom, left sidebar menu on the Test Cases screen, click the Create new folder button.
-
On the New Folder popup window, enter a name for the new folder in the Name field.
-
Click the Save button.
A message appears briefly at the top, right of the Test Cases screen to indicate successful creation, and the folder you created appears in the left sidebar menu.
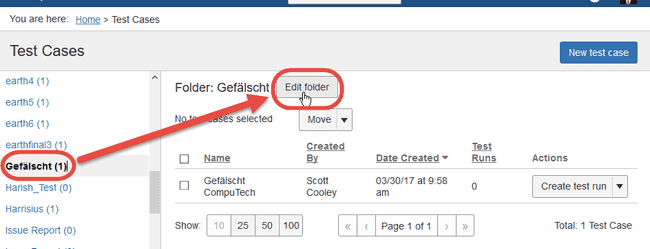
After selecting your folder name from the left sidebar menu, click the Edit folder button to change the name of the folder, or delete the folder. For more information, see Editing a Folder.
Create new while moving: New folders can also be created "on the fly" while moving a test case. Instead of selecting an existing folder on the Move Test Case dialog box (initiated via the Move button on the Test Cases screen), you can click a Create new folder link to name, describe, then select as a new folder to move an existing test case to. For more information, see Moving a Test Case.
Using the link on the Details panel when creating a New Test Case
You can also create a new folder when it occurs to you after already initiating the process of creating a new test case when an appropriately-named folder does not yet exist.
To create a new folder "on the fly" while creating a new test case:
-
On the Test Cases screen, click the New test case button.
-
On the Details panel, under the Folder drop-down menu, click the create new folder link.

-
On the New Folder dialog box, enter a Name for the new folder in the corresponding text field, then click the Save button.
The name of the new folder appears within the Folder drop-down menu field.
Proceed with creating a new test case. For complete information, see [Adding Test Case
Details](adding-test-case-details).
Editing a Folder
The following activity is performed whenever you want to either change the name or the description of an existing folder.
To edit an existing folder:
- On the left sidebar pane of the Test Cases screen, click the menu icon to the right of the folder you want to edit, then click the Edit folder link option.

- Change the Name field content as desired, then click the Save button.

Deleting a Folder
The Delete action for a folder moves all of its test cases to the 'All Test Cases' filter. In other words, it deletes the folder, but not the test cases within it. If you want to archive each test case within a folder you want to delete, refer to Archiving a Test Case.
To delete a folder:
-
On the left sidebar pane of the Test Cases screen, click the folder name, then on the right pane, to the right of the folder name, click the Edit folder button.
-
On the Edit Folder dialog box, click the red Delete folder link near the bottom left.
-
Click the Yes, Delete Folder button when prompted to confirm.


