Grouping Issues
You can organize issues in ways that make sense for your organization by using groups, which can be considered as sets of issues with similar tags. An issue can be associated with up to 10 different groups. To view the groups linked to an issue, click the number link in the Associated Groups column. This displays a list of the associated groups in alphabetical order.
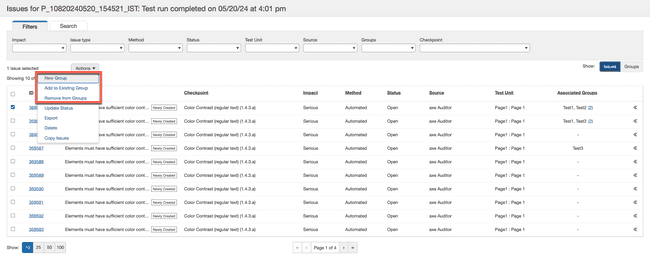
Grouping and removing issues from groups is very easy and can be done via the dropdown menu (see screenshot below) or by right-clicking on individual issues. This approach offers flexibility, allowing you to group issues based on your development processes, such as by user journey, component, page, or role (for example, developer vs. designer).
Adding a New Group
Use the New Group option to add issues to a new group. You can include specific details for the groups you create, which allows the accessibility tester to easily define, assign, and manage groups for remediation. The only mandatory field is the group name.
Adding Issues to an Existing Group
Use the Add to Existing Group option in the Issues tab to include issues in an existing group. In the pop-up window that appears, select the group to which you want to add the issue.
Using the Groups Tab
Once the group is defined, go to the Groups tab and expand the group to view the issues you have created and assigned to it.
Select the chevron at the Group level to open the Group Preview. Here, you can add notes, and a running history of the notes is stored. Each note is limited to 600 characters.
Deleting Groups
Groups can be deleted using the Groups tab. To delete a group, choose the groups you want to remove and select the Delete option from the dropdown menu. You can only delete groups that have no issues. If you try to delete a group with issues, you will be prompted to ungroup the issues first.
When the group has no issues, clicking Delete will display a confirmation window. Click the Confirm button to finalize the deletion of the group.
Removing Issues from Groups
Issues can be removed from groups in either the Groups tab or the Issues tab. In the Groups tab, select the group from which you want to remove all the issues associated with the specific group.
In the Issues tab, select the issue to remove it from all associated groups. Selecting multiple issues will remove the issues from any commonly associated groups.
In both tabs, use the Remove from Groups option. A confirmation window appears, indicating the number of issues being removed from a group or groups. Click the Confirm button to complete the removal of issues from a group or groups.
Note: Removing issues from the Groups tab does not delete the issues from the Issues list in the Issues tab.


