
Performing Bulk Actions on the Issues Page
This topic guides you through the process of performing bulk actions on the Issues Page in axe Monitor's Experimental View. By following these steps, you can perform actions such as delete, export, mark and unmark as issues for issues within completed scan runs.
Navigation: From the main Experimental View page >> Click on the Issues Tab >> Use the Filter Selection Button to Select Issues
Filter the Scan/Run results to show issues related to your chosen scan runs. Select the specific issues you wish to apply bulk actions to from the list of displayed issues.
Users
- Group (Organization) Administrators
- Group (Organization) Members
- Self-registered axe Monitor® Users
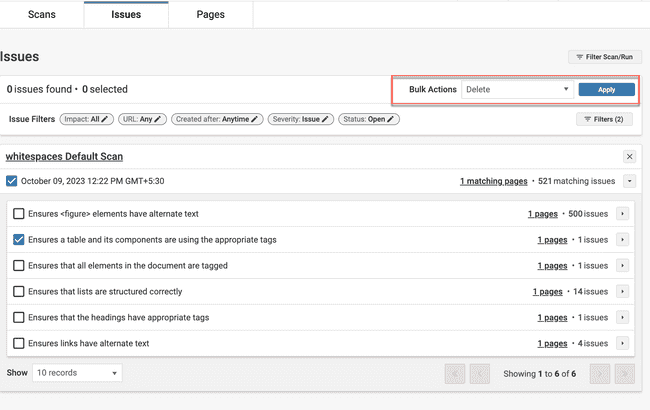
Issues Page - Screenshots


Steps - Using the Issues Page
-
Click the Filter Scan/Run button to select the completed scan runs for which you want to view and analyze the issues.
-
In the Select Runs dialog box that appears, apply filters to select specific scan runs, and click Apply.
-
View the displayed accessibility issues. You can also use the Issues Filters section to refine your view.
-
Select the specific issues you wish to apply bulk actions to from the list of displayed issues. Note: The number of issues selected is displayed on the screen.
The bulk actions that can be performed are:
- Delete
- Export
- Mark as Issue
- Unmark as Issue
- Assign To
- Set Status as Open
- Set Status as Fixed
- Set Status as Ignored
-
Click the Apply button.
Bulk Actions on the Issues Page
Deleting the Issues
Use the Delete option to delete the selected issues. Be careful when doing this as the delete command is irreversible. Deleting an issue results in it being re-added to the issue list as "Open" when the page is re-analyzed. To avoid this, you can instead unmark the issue.
- Select the issues you want to delete.
- Select Delete from the Bulk Action dropdown menu.
- Click the Apply button.
- Click the Confirm button in the confirmation dialog box that comes up.
Exporting the Issues
Use the Export option to export the selected issues into a CSV file. You can select the fields you want included in the CSV file using the Configure Fields option.
- Select the issues you want to export to a CSV file.
- Select Export from the Bulk Action dropdown menu.
- The Configure Fields button appears next to the Bulk Actions button. Click the Configure Fields button.
- Select the checkboxes against the field names in the dialog box thats comes up, and click the Apply button.
- Click the Apply button.
Result: A CSV file is created and downloaded to your local machine.
Note: To filter accessibility issues from best practice issues, export the report. In the CSV file, issues without a WCAG level or success criterion are Best Practice issues.
Marking as Issues
Use the Mark as Issue option to marks an issue's severity as an Issue (from Needs Review) if it is an error that can be definitively identified by automated means.
- Select the issues you want to delete.
- Select Mark As Issue from the Bulk Action dropdown menu.
- Click the Apply button.
- Click the Confirm button in the confirmation dialog box that comes up.
Unmarking as Issues
Use the Unmark as Issue option to unmark an issue's severity as an Issue (and mark them as Needs Review). A Needs Review must be verified by a person to conclude whether or not it is an actual Issue (such as text that has style markup applied and appears to have been used as a heading but is not tagged as a heading, or a table that may be a data table but has no header cells).
- Select the issues you want to delete.
- Select Mark As Issue from the Bulk Action dropdown menu.
- Click the Apply button.
- Click the Confirm button in the confirmation dialog box that comes up.
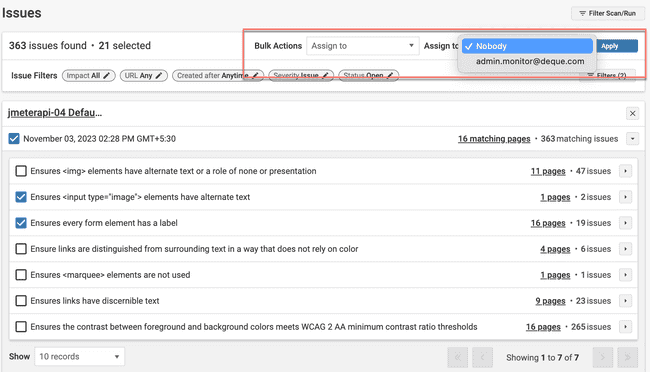
Assign the Issues
Use the Assign to option to assign the issues (or change the assignment) of the selected issues to a user or nobody. By default, the issues are assigned to nobody.
Note: You can only assign one user to an issue.
- Select the issues you want to assign to a user.
- Select Assign to from the Bulk Action dropdown menu.
- The Assign To field with a dropdown menu of available users displays on the screen.
- Select the user to whom you want to assign the issues.
- Click the Apply button.
- Click the Confirm button in the confirmation dialog box that comes up.
Set Status
Use the three available options for setting status to set status of the issues to Open, Fixed or Ignored.
- Select the issues for which you want to change the status.
- Select Set Status as Open, Set Status as Fixed, or Set Status as Ignored from the Bulk Action dropdown menu.
- Click the Apply button.
- Click the Confirm button in the confirmation dialog box that comes up.