Managing Issue Details
This topic guides you through the process of viewing and managing the issues within a completed scan run in the Issues page. By following these steps, you can view and edit each of the issue.
Navigation: From the main Experimental View page >> Click on the Issues Tab >> Use the Filter Selection Button to Select Issues >> Use the View Issue Details button
Users
- Group (Organization) Administrators
- Group (Organization) Members
- Self-registered axe Monitor® Users
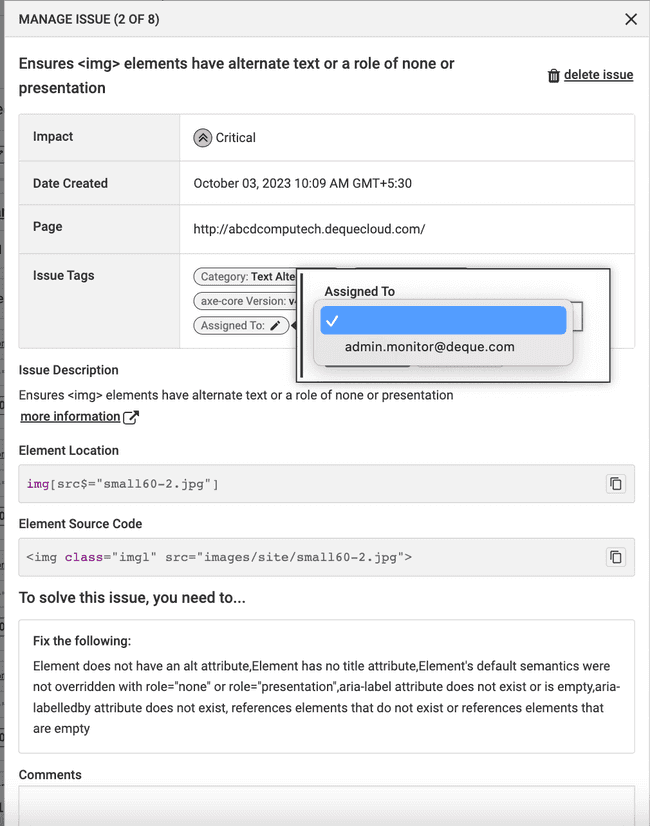
Manage Issues Dialog Box - Screenshot


Steps - Using the Issues Page
- View the displayed accessibility issues in the Issues page.
- Select the specific issue which you want to manage, and click the View Issue Details button (eye icon) next to the issue.
- This brings up the Manage Issues dialog box.
- Click the Apply button.
Bulk Actions on the Issues Page
Deleting the Issues
Use the Delete option to delete the selected issues. Be careful when doing this as the delete command is irreversible. Deleting an issue results in it being re-added to the issue list as "Open" when the page is re-analyzed. To avoid this, you can instead unmark the issue.
- Select the issues you want to delete.
- Select Delete from the Bulk Action dropdown menu.
- Click the Apply button.
- Click the Confirm button in the confirmation dialog box that comes up.
Exporting the Issues
Use the Export option to export the selected issues into a CSV file. You can select the fields you want included in the CSV file using the Configure Fields option.
- Select the issues you want to export to a CSV file.
- Select Export from the Bulk Action dropdown menu.
- The Configure Fields button appears next to the Bulk Actions button. Click the Configure Fields button.
- Select the checkboxes against the field names in the dialog box thats comes up, and click the Apply button.
- Click the Apply button.
Result: A CSV file is created and downloaded to your local machine.
Marking as Issues
Use the Mark as Issue option to marks an issue's severity as an Issue (from Needs Review) if it is an error that can be definitively identified by automated means.
-
Select the issues you want to delete.
-
Select Mark As Issue from the Bulk Action dropdown menu.
-
View, or edit the issue details.
Note: Use the delete issue button to delete the issue from within the completed scan run.
-
Click the Previous Issue or Next Issue to view the other issues within the compelted scan run.
-
Close the dialog box to go back to the Issues page.
| Field Name | Description |
|---|---|
| Impact | The impact of the issue. It can be any one of the following: Critical, Severe, Major, and Minor. |
| Date Created | The date and time the issue was created. |
| Page | The page on which the issue was found. |
| Issue Tags | The tags associates with the issue. Some of the tags such as Status, Assigned To, and Label can be edited from within the dialog box. |
| Issue Description | The description of the issue. Select the more information link to view any additional information about the Issue including remediation guidance. |
| Element location | The location of source code for HTML issues. Use the copy button to copy the element source code. |
| Element Source Code | A snippet of source code for HTML issues. Use the copy button to copy the element source code. |
| To solve this issue, you need to...Fix the following | Information regarding how to fix the issue. |
| Comments | Add your comments and click Save Comment button to save the comment. |
