
Scan List
When you log into axe Monitor, the Scan List provides a birds' eye view of all the scans you can access in the system. The Scan List displays all the scans you have access to, with scans marked as Favorites sorted by default. Each scan has a scan name, score, critical issues, serious issues, total issues, last run, and scan run status. Users who have permission to edit or delete the scan, those actions are displayed in the Actions column. The issue counts are linked, and provide direct access to filters. For example, a count of “100” in the Critical column will lead you to the detailed list of 100 Critical issues found for that scan.
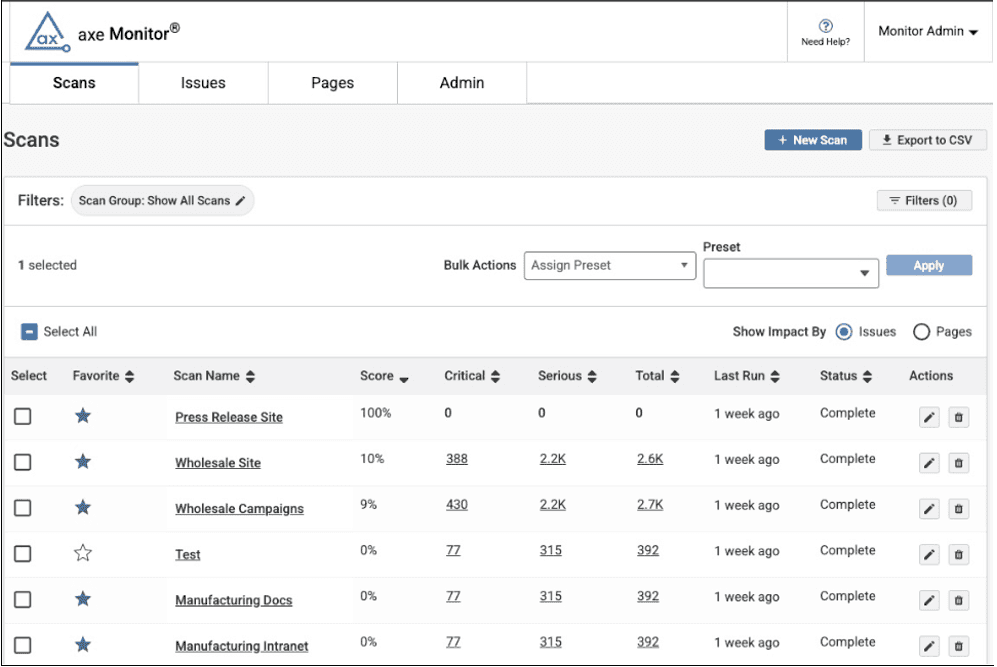
Key Actions
-
Export to CSV: Select the Export to CSV download icon to export the list of scans shown in the table as a .CSV file.
-
+ New Scan: To create a new scan, click + New Scan.
-
Show Impact By: Choose Issues or Pages to adjust the issue counts in the table. The Issues option displays the Critical, Serious and Total issues across the entire scan. The Pages option displays the number of pages with Critical, Serious, and overall Issues
-
Show: User can select the number of scan records to be displayed in the Scans page. At the left bottom of the Scans page, from the Show drop-down, choose an option. The available options are:
- 10 records
- 25 records
- 50 records
- 100 records
You can also navigate through additional records by clicking the arrow icons located at the right bottom of the Scans page.
Filters
By default, the Scan List is filtered to show scans from all groups you have access to. Next to the active filters, select the pencil icon to modify the filters. Or click the Filters to apply more filters.
On the Filters modal:
- Sort order: By default, this optoin is set to Descending. Select the radio button for Ascending to modify the sort order.
- Scan Name: Enter a partial or full scan name to review only the matching scan.
- Sort by: Choose a column title from the Sort by drop-down.
- Scan Group: Select a scan group from the Scan Group drop-down. Select the + icon to filter to the group. Add additional groups as requied. For two or more groups, use the checkbox to specify “Only show a scan if it belongs to all of the selected groups”
- Scanned After: Enter a date in MM-DD-YYYY format to only review recent scans.
- View Only My Issues: Enable this checkbox to filter scans and their issue counts to show only issues assigned to you.
- Include Needs Review: Enable this checkbox to control whether you want “needs review” issues to show in the issue counts.
- Click the Save to set your filters or Cancel to exit.
Bulk Actions
- To select a single scan, choose the desired scan from the available list and and enable the appropriate checkbox or check the Select All checkbox to display bulk actions.
- Choose an option from the Bulk Actions drop-down. The available options are as follows:
- Favorite and Unfavorite
- Delete: A confirmation dialog appears to confirm the action. Deleted scans cannot be recovered.
- Apply Shared User Flow Script: From the Bulk Actions drop-down, select Apply Shared User Flow Script option. The Select Shared Script button appears next to Bulk Actions option. Click Select Shared Script and a dialog appears. Choose a script from the drop-down and click Apply.
- Apply Shared Session Script: Choose a script from the Select Shared Script drop-down.
- Assign Preset: Choose a preset from the Preset drop-down.
Start Prioritizing Accessibility Issue
To drill into scan results, select a scan name or the Critical issue count for the scan. To analyze results across several scans at once, select axe Reports in the main navigation page.