System Administration
Settings
The Admin Settings screen is used by System Administrators to manage the axe-core version, accessibility standards available for selection in test runs, and to enable or disable public share settings for their organization. Administrators can enable multiple axe-core versions for their users so that they can test the test runs with different set of rules provided by axe-core to help verify, validate, and compare the issues reported or fixed.
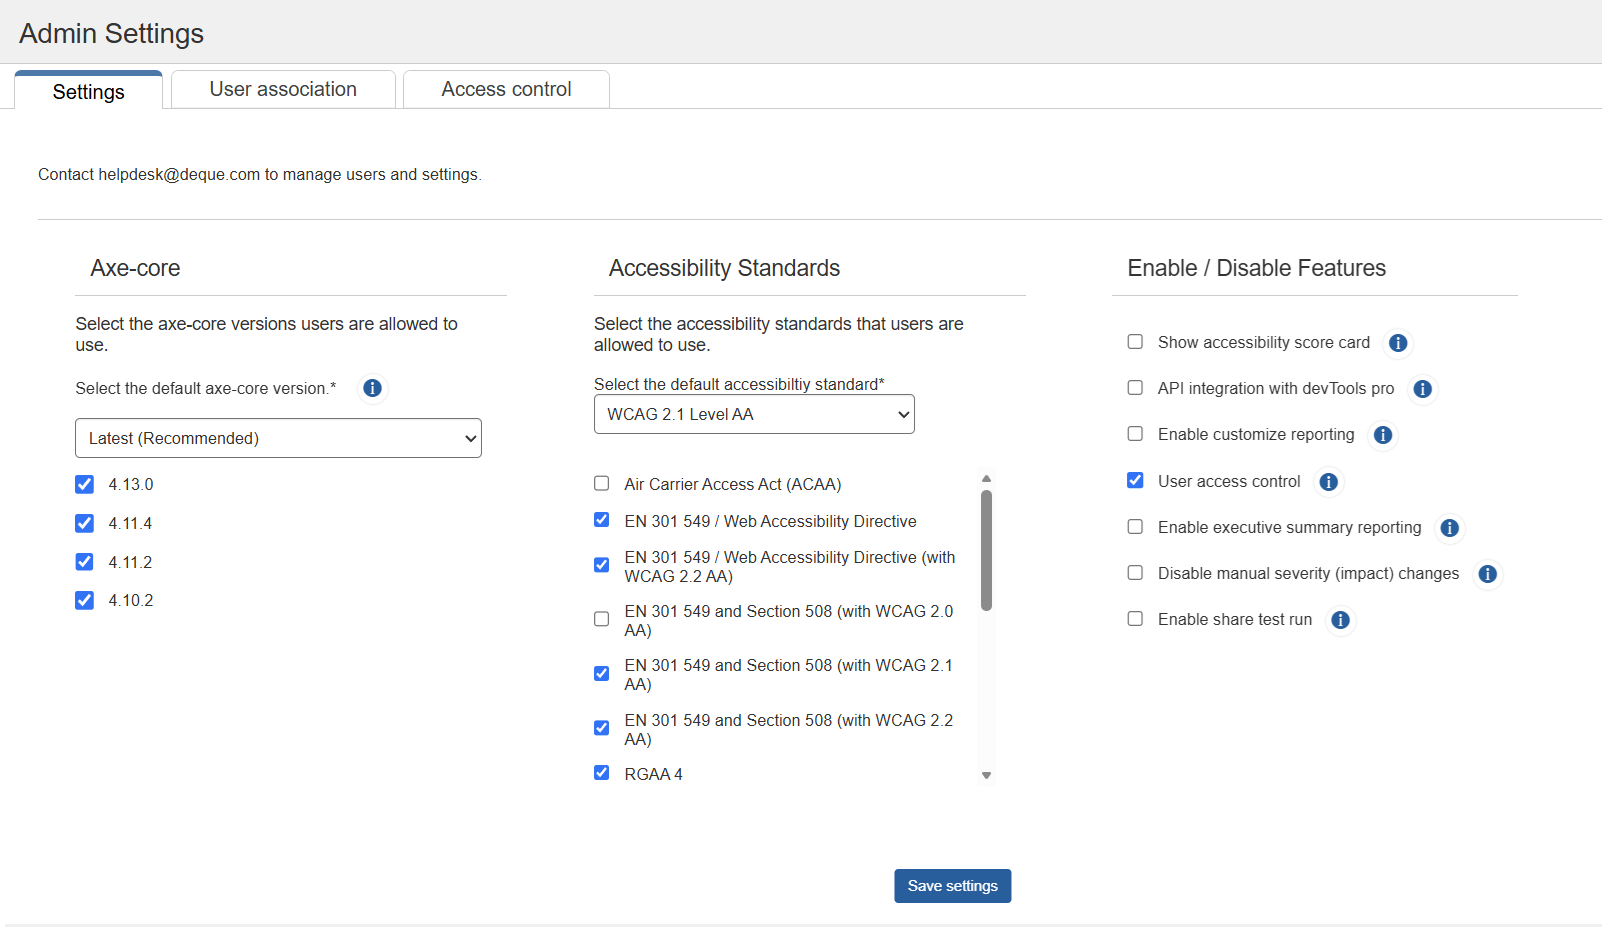
Access: When a user has been granted appropriate security access group role membership for application administration, the Admin Settings option will appear on the main horizontal menu bar after successful sign-in.
Administration of the axe Auditor software application system includes the ability to manage:
-
Axe-core drop-down list menu and checkboxes: Select the axe-core version from the drop-down list menu which the administrator wants the users to allow.
Note 1: Selecting the option, Latest (Recommended) from the drop-down list ensures that your default axe-core version is always the most current. With this option selected, the administrators won’t have to update the default axe-core version every time a new axe-core version is added to axe Auditor. Selecting this option also ensures that any newly added axe-core version is always checked in the list of available versions below the drop-down menu.
Note 2: Axe Auditor does not support axe-core versions below release 4.5, and these versions are not listed in the axe-core checkboxes.
Note 3: Following a release upgrade, if the axe-core has been updated, the accessibility standards in the Admin Settings are overridden with the default settings. To restore your preferred settings, reapply your custom accessibility standards.
-
Accessibility Standards drop-down list menu: Required. The default accessibility standard to be used during manual accessibility testing. Any new test run created will be created with the standard selected as default. It can be changed by the user for each test run.
Selecting the default accessibility standard populates the available standards checkbox group with a list of available standards from which to select when creating a new test case.
Note: Following a release upgrade, if the axe-core has been updated, the accessibility standards in the Admin Settings are overridden with the default settings. After upgrading axe Auditor, ensure that you reapply your custom accessibility standards in the Admin Settings.
-
Enable / Disable Features
The administrator can use the Enable / Disable Features section to enable or disable optional features for your organization as needed.
- Show Accessibility Score Card: Displays the accessibility score graph on the Test Run Overview page.
- API integration with devTools Pro: Displays the test unit ID in the Test Info section and on the test unit card on the Test Run Overview page. You can use this ID to send data from Axe DevTools Pro to Axe Auditor.
- Enable customize reporting: Allows you to add custom fields to the Test Case and Test Run screens and upload a logo to customize audit reports.
- User access control: Enables access control for test cases and test runs. When this option is disabled, all users can access test cases.
- Enable executive summary reporting: Displays the executive summary report on the Test Run Details page.
- Disable manual severity (impact) changes: Restricts severity (impact) changes to Admin users when they create or edit an issue.
- Enable share test run: Allows users in your organization to share test runs with anyone, including users who do not have an Axe Auditor account.
User Association
The User association tab on the Admin Settings screen allows system administrators to control which test cases each user can view. By associating users with specific test cases, administrators can ensure that Axe Auditor customers can access only their own test case data and not data associated with other customers or projects.
Administrators can search for a user and one or more test cases and associate them in a single step. The two panels on the right side of the tab display the current associations:
User associated test cases: Displays the test cases associated with the selected user.
Test Case Associated Users: Displays the users associated with the selected test cases.
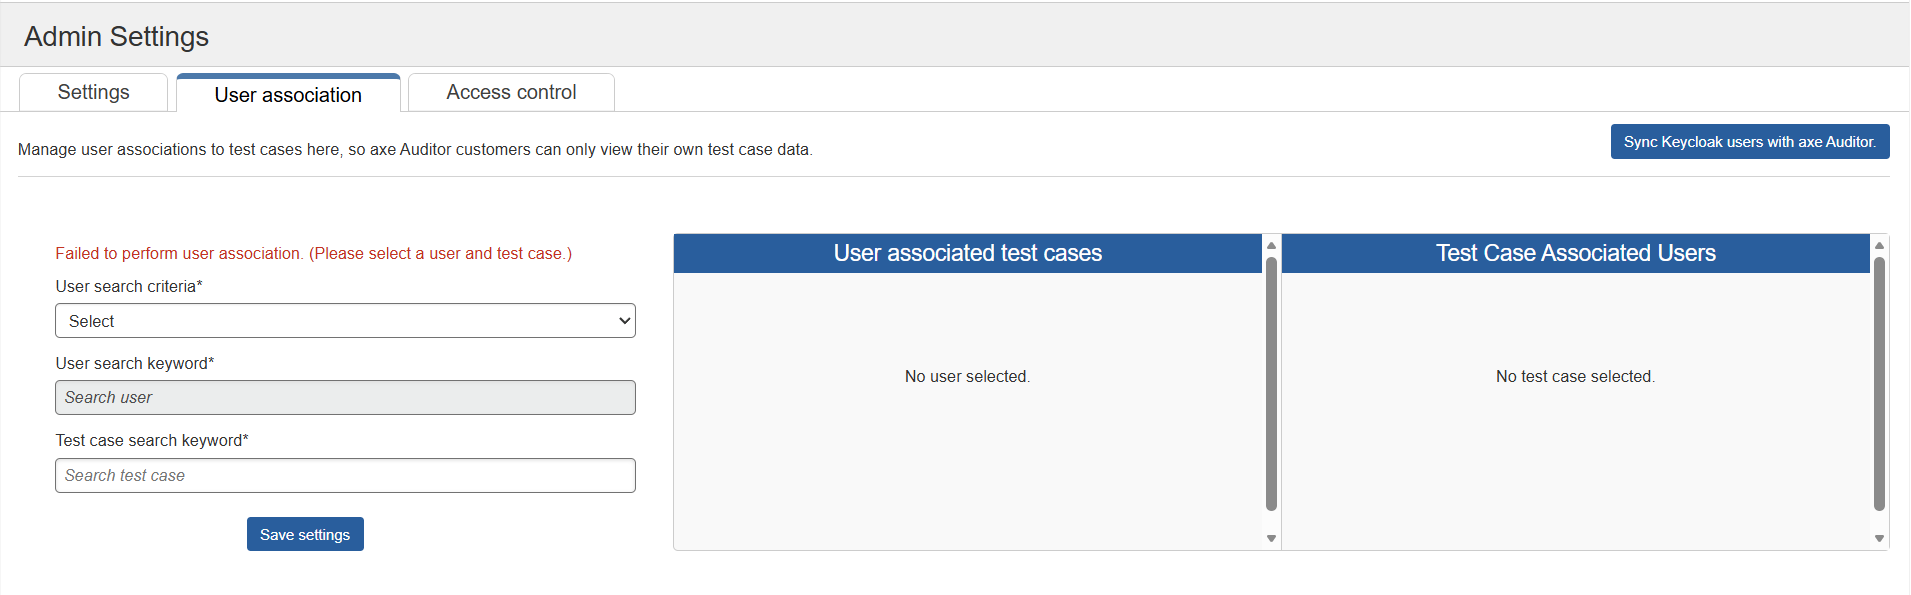
The User association tab includes the following:
- Sync Keycloak users with axe Auditor: Synchronizes the user accounts in Keycloak with axe Auditor so that newly added users are available for selection on this tab.
- User search criteria drop-down: Required. The attribute used to search for a user (for example, User name). The User search keyword field remains disabled until you select a search criterion.
- User search keyword field: Required. Enter all or part of the user’s name to find matching users.
- Select filtered user drop-down: Appears after you enter a user search keyword. Lists the users that match the keyword. Select the user you want to associate with test cases.
- Test case search keyword field: Required. Enter all or part of a test case name to find matching test cases.
- Select filtered test cases checkbox: Appears after you enter a test case search keyword. Lists the test cases that match the keyword. Select one or more checkboxes to choose the test cases to associate with the selected user.
- Save settings: Saves the association between the selected user and the selected test cases.
User associated test cases panel: Displays the selected user and the test cases currently associated with that user. When no user is selected, the panel displays No user selected. If the user has no associations, the panel displays a message stating that the user has no associated test cases. Test Case Associated Users panel: Displays each selected test case and the users currently associated with it. When no test case is selected, the panel displays No test case selected. If a test case has no associations, the panel displays a message stating that the test case has no associated users.
Associate a user with test cases
To associate a user with test cases, preform the following steps:
- On the Admin Settings page, select the User association.
- Select a user from the User search criteria drop-down (for example: User name, Email, or Name). The User search keyword field is available.
- Enter part or all of the user's name in the User search keyword field. The Select filtered user drop-down list menu appears, listing the users that match your keyword.
- Type the user in the Test case search keyword field and the Select user from the Select filtered user drop-down. The User associated test cases panel displays the selected user and any test cases already associated with that user.
- Click Save Settings. The system saves the association between the selected user and the selected test cases.
Access Control
The Access control tab on the Admin Settings allows page system administrators to manage restricted access to Axe Auditor. The left pane contains the following sections: Contractors, Jira user access, and Client Manager.
Contractors
The Contractors section allows administrators to manage contractor users and their access. A contractor is an external user, such as a third-party tester, who can view and work only on the test cases explicitly assigned to them. Contractors cannot access other test cases, test runs, reports, or system settings.
From this section, administrators can view contractors and their assigned test cases, add existing users as contractors, and remove contractor access.
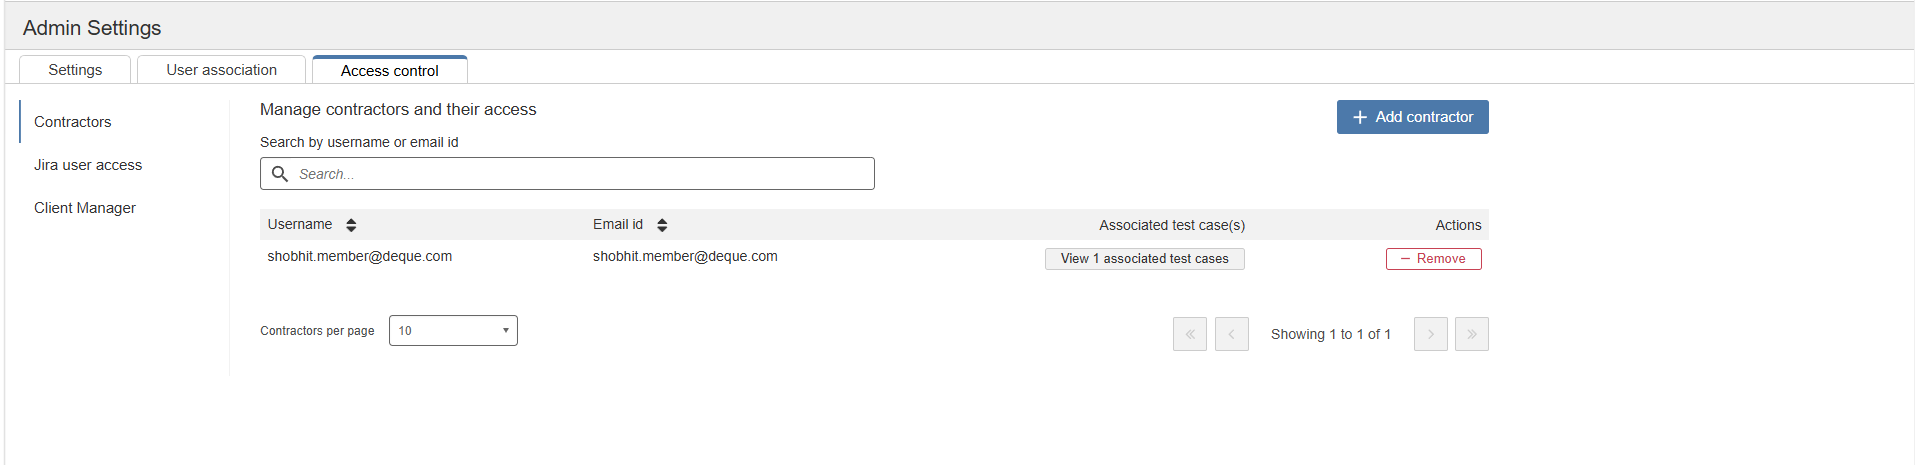
Access: The Access control tab is available to users only when the Admin enables User access control option. To enable this option on the Settings page, select the Access control tab, and then select Contractors in the left pane.
The Contractors section includes the following:
-
Search by username or email ID field: Filters the contractor list by the username or email address you enter.
-
Add contractor button: Opens the Add contractor dialog, where you can select existing users to add as contractors.
-
Contractor table: Lists all current contractors with the following columns: Username and Email ID: Displays the contractor's username and email address. Use the sort arrows in the column headers to sort the list.
Associated test case(s): Displays a View n associated test cases button, where n is the number of test cases assigned to the contractor. Select the button to view the list of assigned test cases.
Actions: Displays a Remove button that removes contractor access from the user.
Contractors per page drop-down list and pagination controls: Set the number of contractors displayed on each page and navigate between pages.
Add contractors
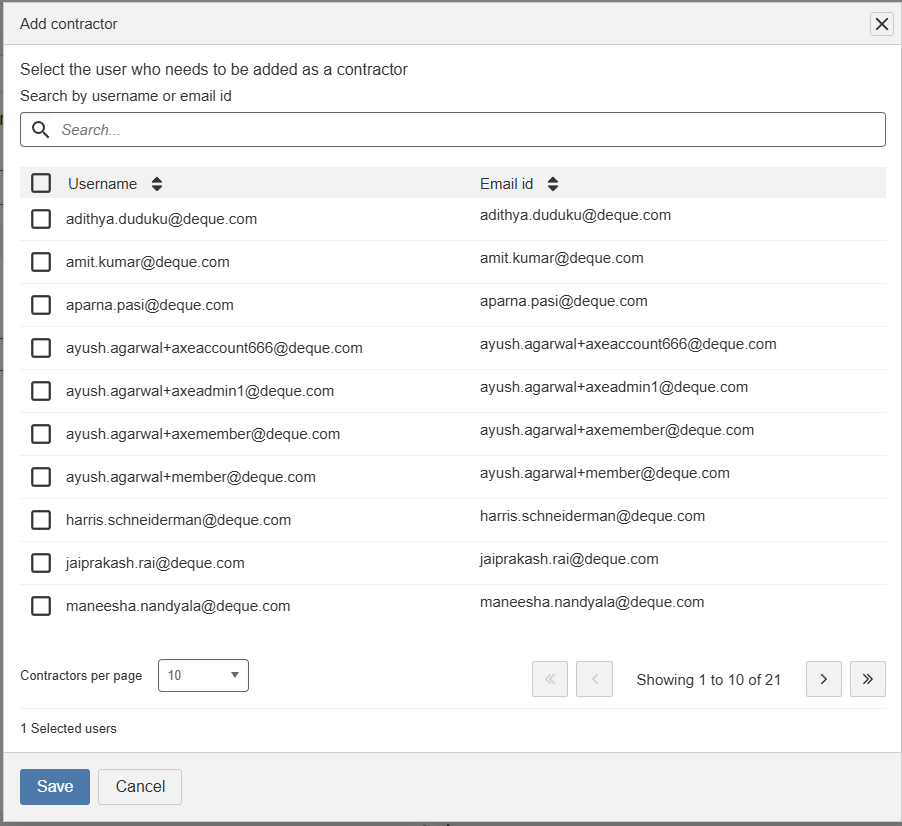
Only existing Axe Auditor users can be added as contractors. Adding a contractor does not create a new account; it changes the access level of an existing user.
To add a contractor, preform the following steps:
-
On the Admin Settings page, select the Access control, and then select Contractors in the left pane. The Add contractors dialog appears.
-
Select the checkbox next to each user you want to add as a contractor. To select all users shown, select the checkbox in the table header. The number of selected users appears below the list, for example, 1 selected user.
-
Click Save. A confirmation message appears, and the selected users are listed in the contractor table. These users can now view only the test cases assigned to them.
To remove a contractor:
- In the Actions column, select the contractor and click Remove. The user is removed from the contractor list and receives member permissions with Edit access.
Jira User Access
The Jira user access section allows system administrators to control which users can push accessibility issues from axe Auditor to Jira. Only users listed in this section can push issues to Jira from the Issues and View Issue pages. Administrators can add users to grant this access or remove users to revoke it.
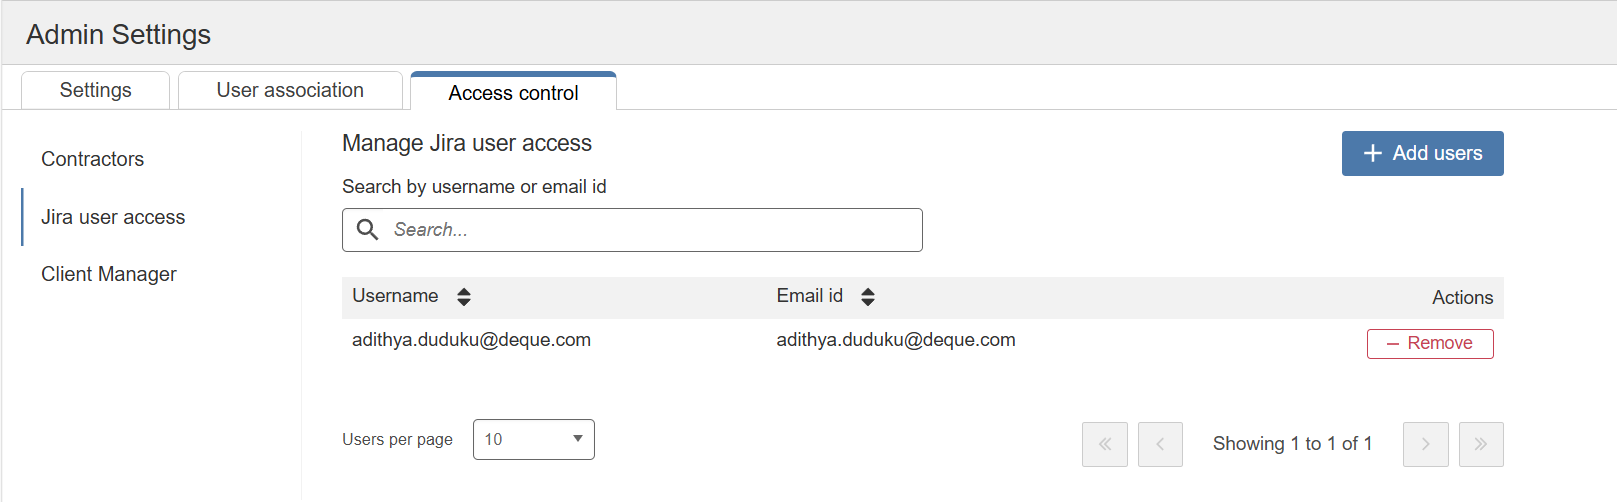
Access: The Access control tab is available to users only when the Admin enables User access control option. To enable this option on the Settings page, select the Access control tab, and then select Jira user access in the left pane.
For more information about Jira integration, template access management, and custom integration, see Jira Integration
The Jira user access section includes the following:
-
Search by username or email id field: Filters the list by the username or email address you enter.
-
Add users: Opens the Add users dialog, where you can select users to grant Jira access.
-
User table: Lists all users who have Jira access with the following columns:
Username and Email id: Displays the user's username and email address. Use the sort arrows in the column headers to sort the list.
Actions: Displays a Remove button that revokes the user's Jira access.
-
Users per page drop-down list menu and pagination controls: Set the number of users displayed on each page and navigate between pages.
Grant Jira Access to Users
To grant Jira access to users, preform the following steps:
-
On the Admin Settings page, select the Access control and then select Jira user access in the left pane.
-
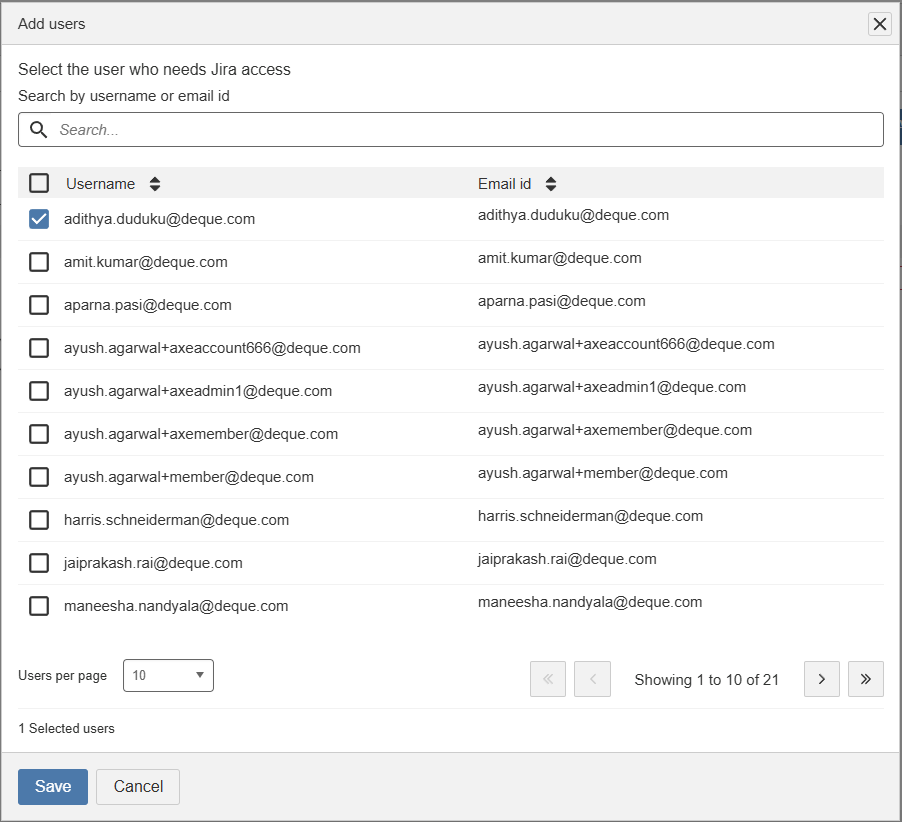
Select Add users. The Add users dialog appears and lists the users available to grant Jira access.
-
Select the checkbox next to each user who needs Jira access. To select all users displayed, select the checkbox in the table header. The number of selected users appears below the list, for example, 1 selected user.
-
Click Save. The selected users are listed in the Manage Jira user access table and can push issues from axe Auditor to Jira.
To remove Jira access from a user:
- In the Actions column, select the user and click Remove. The user is removed from the table and can no longer push issues to Jira.
Client Manager
The Client Manager section allows system administrators to grant additional privileges to existing members so they can add and manage clients.
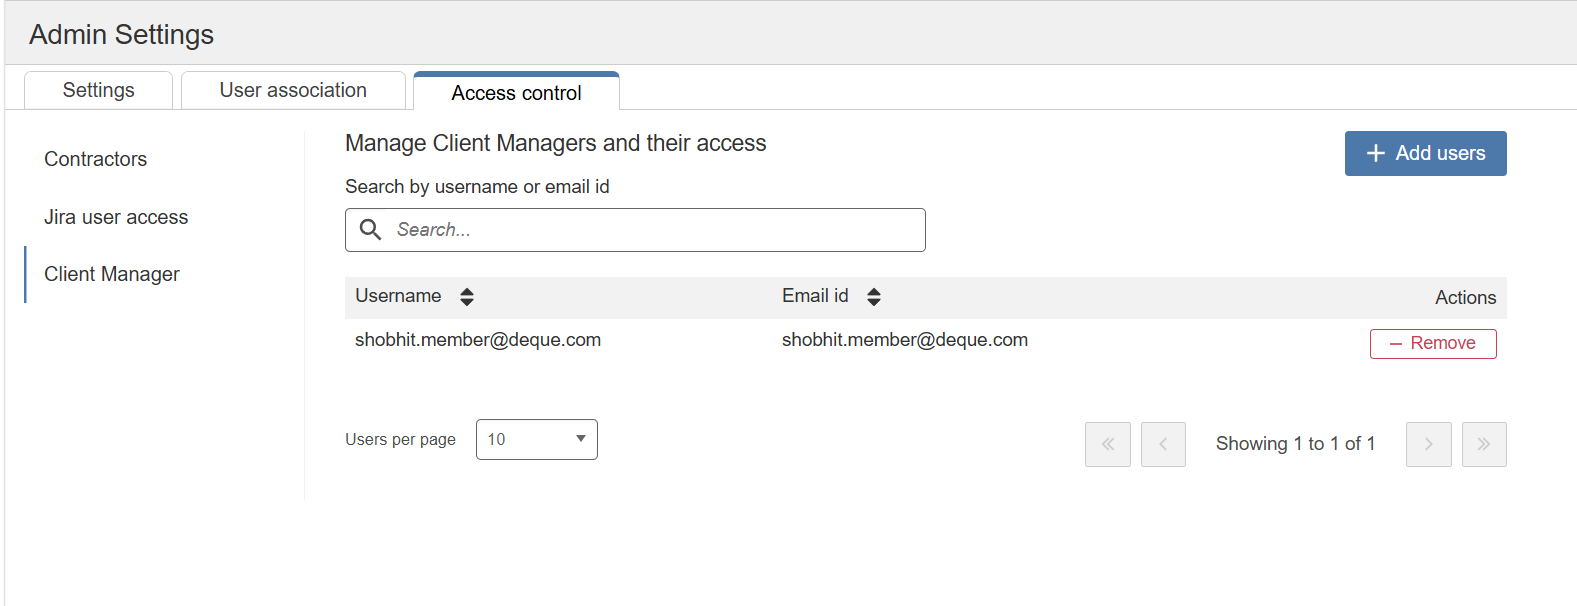
Access: The Access control tab is available to users only when the Admin enables User access control option. To enable this option on the Settings page, select the Access control tab, and then select Client Manager in the left pane.
The Client Manager section includes the following:
- Search by username or email ID field: Filters the list by the username or email address you enter.
- Add users: Opens the Add users dialog, where you can select users to grant Client Manager access.
- User table: Lists all client managers with the following columns: Username and Email ID: Displays the user's username and email address. Use the sort arrows in the column headers to sort the list. Actions: Displays a Remove button that revokes the user's Client Manager access.
- Users per page drop-down list and pagination controls: Set the number of users displayed on each page and navigate between pages.
Add Client Managers
To add client managers, preform the following steps:
-
On the Admin Settings page, select the Access control, and then select Client Manager in the left pane.
-
Click Add Users. The Add User dialog appears.
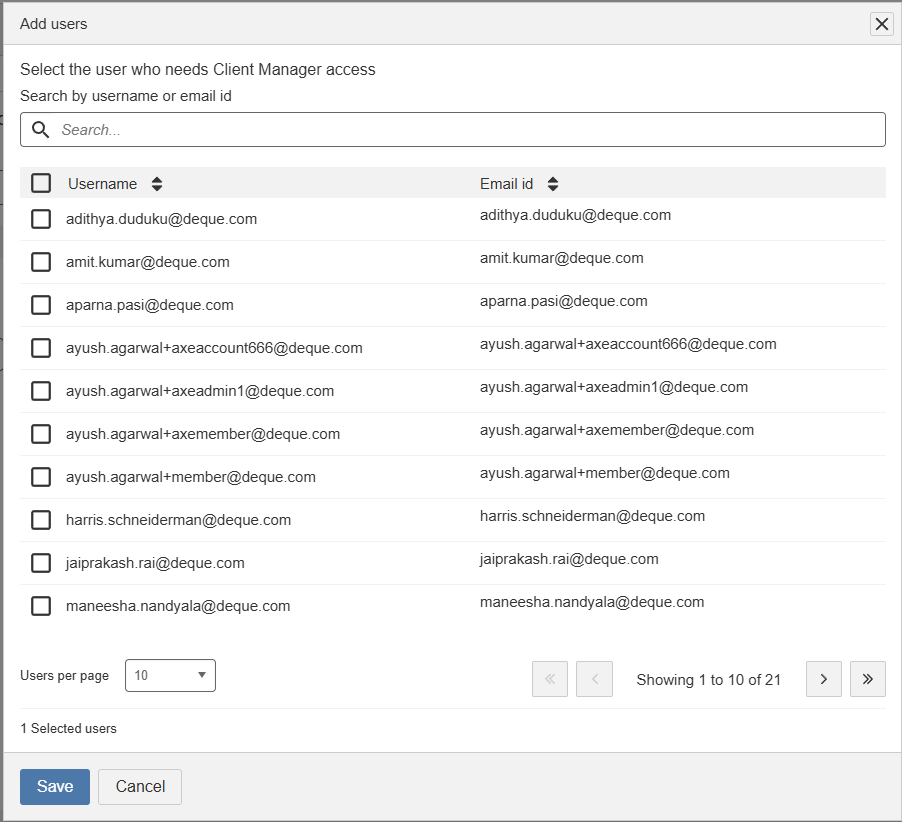
- Select the checkbox next to each user who needs Client Manager access. To select all users displayed, select the checkbox in the table header.
The number of selected users appears below the list, for example, 1 selected user.
- Click Save. The selected users are added as client managers and can create and manage clients.
To remove client manager access:
- In the Actions column, select the user and click Remove. The user is removed from the table and no longer has Client Manager access.
Update axe Reports
Select from the three different types of users in the Update axe Reports dropdown menu to authorize these users to send the configured test cases and test runs data to axe Reports. The users include:
-
System Administrator Only: Selecting this option allows only the users with administrator privileges to view and use the "Update axe Reports" button while creating both test cases and test runs. Additionally, these administrators exclusively have access to the "Update axe Reports" button on the Test Run Overview screen.
-
Test Case Owners: A test case owner is defined as the user who creates a test case. They have the authority to set up and manage all the details of the test case. Selecting this option grants special privileges to the user, and this user can then access and update the "Update axe Reports" fields when setting up both test cases or test runs.. With this privilege, the test case owners can also view and use the "Update axe Reports" button to send the updated data to axe Reports on the Test Run Overview screen.
-
Test Case and Test Run Owners: A test run owner is the user who creates a test run. Similar to a test case owner, a test run owner has control over the test run they have created, but not necessarily over the test case associated with the test run. Selecting this option grants special privileges to the test case and test run owners to access and update the "Update axe Reports" field when setting up a test run, and the "Update axe Reports" button on the Test Run Overview screen.

Setting the Axe-Core version
Since test cases and test runs can span a long period of time, you may want to preserve the version of the checkpoint tests for manual testing guidance until complete. So, even though a newer version becomes available, a System Administrator can set the default Axe-core for the system, which will apply to all new test cases created.
To set the axe-core version:
- To the right of the Axe-core version field, activate the down arrow.
The menu expands downward to display available list option version numbers.
- Select the desired version number option in the list to highlight and select it.
The drop-down menu collapses (closes) and the field becomes populated with your selection.
Setting the default standard and available standards
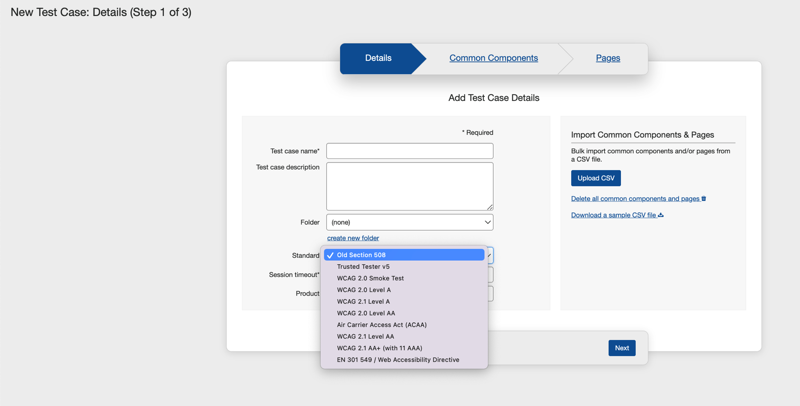
The available standard(s) admin setting populates the Standard drop-down menu on the Details (Step 1 tab) of the New Test Case screen with a list of available standards from which to select when creating a new test case. When you want to restrict which rule sets are available to test against for axe Auditor users (for example, if you only wanted to test for Section 508 compliance), follow this procedure.
The default standard selected here reflects as the default standard on the Details (Step 1 tab) of the New Test Case screen.
To set the available standard:
- On the Admin Settings screen, go to the Default Accessibility Standard field.
- Select the standard from the drop-down menu. The default standard is WCAG 2.1 Level AA.

The drop-down menu collapses (closes) and the field becomes populated with your selection.
To set the available standards:
- On the Admin Settings screen, use the checkboxes to the right of the Available standards field.
- Select the requiredcheckboxes (for example, Section 508) option(s) from the list.
- Activate the Save settings button.
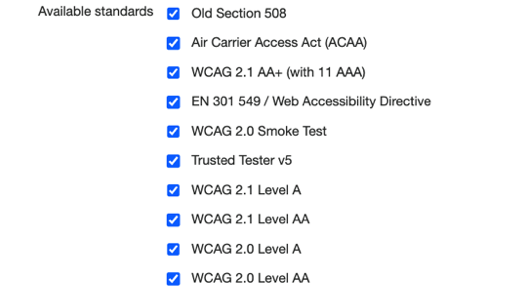 4. Activate the Save settings button.
A confirmation message appears at the top, right of the Admin Settings screen to indicate successful completion of the setting change(s):
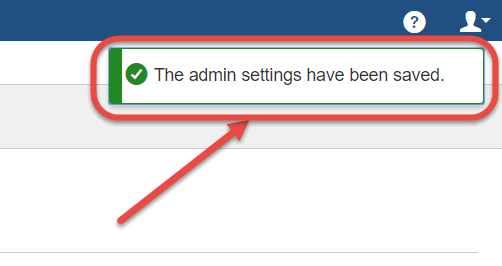
Result: The list of available items is restricted accordingly in the Standard drop-down menu list on the Details tab of the New Test Case screen. The default standard selected here appears as the default option in the Standard field.