
Test iOS Apps for Accessibility
Now that you've installed and updated Xcode, verified installation of Xcode Command Line Tools, and installed the Axe DevTools Mobile Analyzer on your Mac, you have everything you need to start running accessibility tests! Follow the steps below to begin scanning your iOS apps.
Launch the App and Sign In
- Launch the Axe DevTools Mobile Analyzer application from your Applications folder or Launchpad.
- Choose your server configuration before signing in. Your organization administrator can provide this information.
- For standard SaaS, choose 'Standard Server.'
- For On Prem or Private Cloud choose 'Custom Server,' and enter the backend URL provided by your organization’s administrator.
- Select 'Sign In.' A browser window will open.
- Log in with your Deque username and password when prompted. Note: If you are already logged in with your Deque username/password on the web, the browser will automatically sign you in to the Mobile Analyzer app. You will not need to enter your username and password.
- Return to the Mobile Analyzer app.
Set Up Physical Device Testing
The first time you sign in, the Analyzer checks that your Mac is ready to test on physical devices and walks you through any remaining setup. (On future launches, the app remembers your choices and will take you straight to Ready to Test.)
If you are only testing on a simulator, you can select Use Simulator Instead on any of these screens and skip ahead to Ready to Test.
1. Xcode readiness check
On launch, the Analyzer confirms that Xcode is installed, that your command line tools point to the full Xcode app (not just the standalone Command Line Tools), and that you have accepted the Xcode license agreement.
2. Sign in to Xcode with your Apple ID (first-time Xcode users)
To test on a physical device, your Mac needs an Apple Developer team and a signing certificate. If you have never used Xcode before, you won't have either of these yet, and the Analyzer shows the Apple ID Required for Physical Devices screen.
To resolve this issue, sign in to Xcode with your Apple ID. Signing in creates the signing certificate and registers your Apple Developer team on your Mac. The Analyzer detects this automatically and continues on its own.
3. Select your Apple Developer team
On the Set Up Physical Devices screen, choose your Apple Developer team from the dropdown, then select Connect Device. The Analyzer applies the code signing configuration for you.
- Select your organization's paid team — do not select your Personal Team.
- If your team isn't listed, make sure you have signed in to Xcode with the Apple ID that belongs to that team.
- Free (personal) Apple Developer accounts are not supported. If one is selected, you will be prompted to choose a different team.
Ready to Test
Once setup is complete, you'll see a screen titled Ready to Test.
Connect your Device
- If using a physical device, connect it to your computer via USB.
- If prompted, select 'Trust.'
- If using a simulator, ensure the simulator is running.
Note: Your device or simulator must have access to the internet.
(Visit axe.deque.com on your device or simulator’s browser to verify your internet connection.)
Take a Scan
- Select 'Scan a New App.'
- Select your device or simulator from the list.
- Select your app from the list.
- Optional: Provide a name for the scan. The default name will be the screen's title, if one exists.
- Optional: Add tags for the scan. Use tags to organize results on the Mobile Dashboard.
- Ensure your device is awake and the screen you want to scan is visible.
- Select 'Scan'.
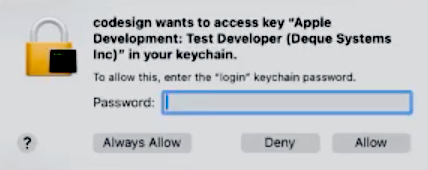
- Enter your keychain password if prompted, and choose 'Always Allow.'
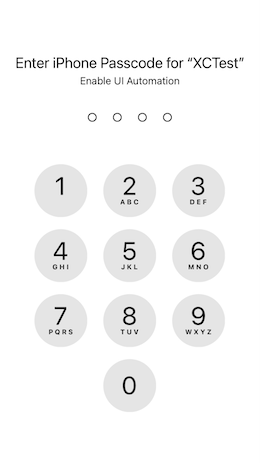
- If using a physical device, enter your device’s passcode when prompted to start test automation.
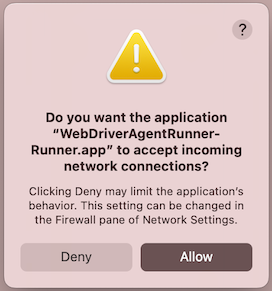
- If using a simulator, allow the
WebDriverAgentRunner-Runner.appto accept incoming connections when prompted.
Review Results
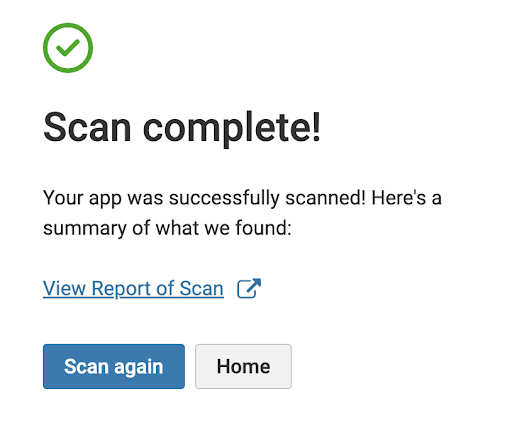
- Once the scan is finished, click the 'View Report' link to review your test results on the Mobile Dashboard.
Repeat for each screen you want to test.
- To scan another screen, click Scan again and follow the instructions, starting at Step 4 above.
Finish Testing - Physical Device Only
- When testing on a physical device, 'Automation Running' will remain on the screen. You can navigate to new screens and take additional scans while it's still running.
- When you are finished testing, hold both volume buttons to stop automation on your device.